Monday, January 20, 2014

MS SQL Server Replication (2008)

Introduction

I was searching on Google on SQL Server Replication, which I planning to implement one of my current project and found this great article on code project....

There are a lot of people who subscribe for magazines like readers digest or India today or get organizational news update every month in their mail box. Information about the latest organizational/national development is communicated over these email/magazines. The information is directly dropped in mail box or at the door step. We simply need to subscriber for the desired magazine or mailer. Similarly the replication feature in MS SQL Server moves the data from a remote server to our local server boxes via publications and subscriptions mechanism. There are various reasons and scenario where replications can be considered a very strong tool for data relay. We could consider replication for, 

  1.  Getting the data closer to the user, consider a server stationed in Germany and since the business also operates at Bangalore in India we need the data quite frequently. Now every time we need the data from the Products or Sales table we need to use a linked server, connect to the German Server and pull the data. This will have impacts like: 
    • We need to rely heavily on the network connectivity each time we pull the data. 
    • Secondly the source server will have to bear the load of data reads. 
    • Also these ad-hoc queries might create conflicts if there is any exclusive lock on a record on account of any transaction taking place on the source data. Further to this, the ad-hoc pull queries will run for a really long time in this case eating up network bandwidth and also causing unnecessary load on the source. 
    • And if the data is to be pulled on a regular basis this ad-hoc queries seem really out of place option. Consider replication for removing impacts of heavy read intensive operations like report generation etc. Replication is a very good option when the desired data is simply read only and the update to the source is not intended. 
  2. Consider replication when server pulling the data intends to own the pulled data i.e. make changes to the pulled version without impacting the source. Replication provides the desired autonomy to the subscriber.
  3. Consider replication when server pulling the data intends to own the pulled data i.e. make changes to the pulled version without impacting the source. Replication provides the desired autonomy to the subscriber.

Getting Started with Replication

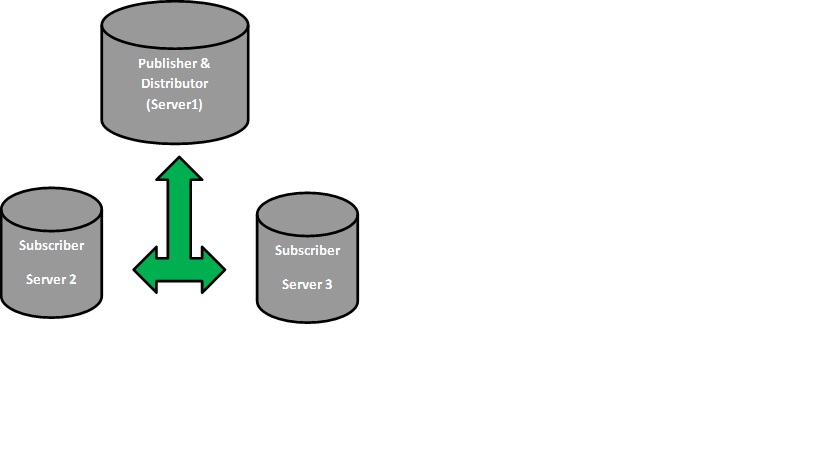
Before getting into the details on how to setup replication let’s try to get acquainted with the terms involved with this exciting feature. Replication traditionally takes the Publisher/Subscriber analogy. It’s quite similar to the magazine example. For any magazine there is a publisher who publishes information in the form ofarticles. Once the magazine (which is collection of article and is called publication) is published there needs to be a distributor who will distribute it to people like you and me who are actually the subscribers. This forms the standard of the entire Publisher/Subscriber cycle. But there could be changes in the setup like there is a publisher who also acts as distributor or there could be a distributor who is also a subscriber. The key terms are:
Article: The article is the information that is going to be replicated. It could be a table, a procedure or a filtered table etc.
Publisher: The publisher is the database on the source server which is actually replicating the data. Thepublication which is collection of articles (various objects in the database) is published by the publisher.
Distributor: The distributor can be considered as the delivery boy who brings the publications to the subscriber. The distributor could himself be a publisher or a subscriber.
Subscriber: Subscriber is the end receiver of the publication who gets the data in the form of subscriptions. The changes published are propagated to all the subscribers of the publications through the distributor. The subscriber simply has to create a subscription on the publication from its end to receive the data.

There are various types of replication:
  • Transactional Replication
  • Transactional Replication with Updatable Subscriptions
  • Snapshot Replication
  • Merge replication

Configuring a Distributor

Before trying to get insights about each of the replications and how to configure it, it’s important to setup a distributor.
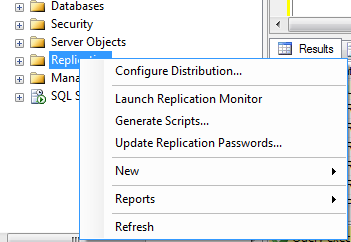
Select the server which is to act as the distributor and the right click on the replication folder and then click configure Distribution.

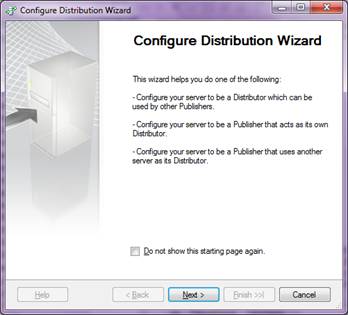
This will lead to the below screen, click next.
The next screen as below will as to either configure the current server as the Distributor or connect to the different desired server and configure it to be a distributor. Let’s select the current server and click next.

The next screen point to the folder path where the snapshots of the publications will be kept by the snapshot agent, we will keep the default value and click next. You can also specify the network folder if you have....
How to create network folder : http://www.dummies.com/how-to/content/how-to-map-a-network-folder-in-windows-7.html
The Next screen configures the Distribution database its data (.MDF) and Log (.ldf) files. Bear in mind once the distribution has been configured on a server, the system databases will have an additional database added to it “Distribution”. Click next.
On clicking next it brings you to the screen where you can add all the servers which will be the publishers and use the currently being configured distributor to distribute its publications. By default the current server will be added as the publisher once could add more servers. Click next.

Click next on the below screen and proceed.
his will bring you to the last screen which will have the summary of the configurations. Click finish to complete the Distributor configuration.
Once you click on Finish, you will see new database with name "distribution" and couple of jobs are created under the job...


If you want to remove the existing distribution, you can right click on the "Replication" node and click on "Disable Publishing and Distribution..."

And click on Finish button....


Transactional Replication

In the transactional replication the transactions occurring on the published articles from the publisher are forwarded on to the distributor who in turn replicates the same and commits them on the subscribers. Subscribers can use this data for read only purposes. As transactions are small items to publish the latency for transactional replication is very low. As far as the autonomy is concerned as the data is read only type each of the subscribers cannot update the data and hence there is absolutely no autonomy in this type of replication.
Suppose there is a ticket booking web site, all the tickets booked are centrally stored in the database hosted at New Delhi. There are distribution centers in every city in the country where the bookings are received and the booked ticket shipped at the addresses provided. All the tickets booked from Hyderabad needs to be shipped to the respective customers. The Hyderabad distribution center could setup a filtered (get bookings for Hyderabad only) transactional replication so that every new booking (transaction) is replicated to their center with minimal delay (almost immediately). They need a read only access to the replicated data so transactional replication fits the bill. They could dispatch the booked ticket ASAP with transactional replication setup.
Key facts of transactional replication:
  • As replication happens on a transaction, the latency of replication is very low.
  • The subscription is read only, hence there almost no autonomy for the subscribers.
I1.jpg


Creating Publisher for the Transnational Replication

Right click on the "Local Publication" under "Replication" folder on the SQL Server instance which is going to act like publisher. and then click on "New Publication"
Click on "Next"
Select the database for which you want to publish... In this case I have selected "POS_DataAnalysis" and click on "Next"
Click on the "Transnational Replication" and click on Next...
Expand the "Table" node and select those tables which one you want to publish... Note: It allow to publish those tables, have primary key defined... Marked in read are not eligible for replication as don't have primary key...
click on Next
if you want to add any filter for the selected table you can add here... for now lets publish all the row... so click on "Next"
click on the first check box and click Next...
select the snapshot agent security and click on next
click on next...
Enter the publication name and click on Finish button...
Now we are done with Publisher... lets verify


Creating Subscriber for the Transnational Replication

Right click on "Local Subscriptions" under "Replication" node in the SQL Server , act as subscription and click on "New Subscription" 


click on "Next"


Select the publisher name and click on Next
select the "Push Subscription" and click on next...
select the database and click on next...

select the SQL Server authentication and click on finish

Once it complete sucess fully you can see the 

Wednesday, February 9, 2011

Parameter Sniffing or Spoofing in SQL Server

Currently we are working in a projects which handles data from multiple databases (SQL Server 2005) with massive data. All together these databases size is around 3 TB and one of them is around 1.2 TB. Now I am coming to actual problem we ran into yesterday, one of our stored procedure was taking longer time compare to the time, it takes while executing the sql query separately contains by the stored procedure. In real scenario it is not suppose to be. After long investigation we figure out it is due to "Parameter Sniffing". Thanks to google:):)

A nice thing which I was not aware of, after working last 5 years with SQL Server. Lets come to the topic and try to understand how and why SQL Server does this??

What is Parameter Sniffing?

When an SP is not in the procedure cache, when it is executed the query optimizer needs to compile the SP to create an execution plan. In order to do this the query optimizer needs to look at the parameters that are passed and the body of the SP to determine the best method to go about processing the SP. When the query optimizer looks at the SP’s parameters, to help determine how to optimize the execution of the SP, it is known as parameter sniffing.

Once the query optimizer has sniffed the parameters and determined the best approach for processing the SP, it caches the execution plan in the procedure cache. All subsequent executions of the SP re-use the execution plan from the procedure cache regardless if different parameters are passed. The potential problem with this approach is the parameters that were used when the plan was cached might not produce an optimal plan for all execution of the SP, especially those that have significantly different set of records returned depending on the parameters passed. For instance, if you passed parameters that required a large number of records to be read, the plan might decide a table or index scan would be the most efficient method to process the SP. Then if the same SP was called with a different set of parameters that would only return a specific record, it would used the cached execution plan and perform an table or index scan operation to resolve it’s query, even if a index seek operation would be more efficient in returning the results for the second execution of the SP.

If you have an SP that sometimes processes quickly, and other times processes slowly with different sets of parameters, then possibly parameter sniffing is causing your procedures to have varying execution times. In this article we will look at different methods to write your SPs to help the query optimizer in picking a good execution plan most of the time.

Lets take one example which will give you clear understanding for the same. I am going to use SQL Server 2008 to illustrate this as SQL 2008 version is installed in my laptop. I am also going to use "AdventureWorks" database. If you don't have download from here .

Step 1: Create a new procedure on SalesOrderHeader table to get customer based on customer id.

USE AdventureWorks
GO
CREATE PROC GetCustomerOrders (@FirstCust int, @LastCust int)
AS
SELECT * FROM Sales.SalesOrderHeader
WHERE CustomerID between @FirstCust and @LastCust

This code accepts two parameters. These two parameters are used in a WHERE clause to determine which SalesOrderHeader records to return. Now, let’s look at the execution plan for this SP when we call it with two different sets of parameters. First, let’s call it with the following code:

USE AdventureWorks
GO
DBCC FREEPROCCACHE
EXEC GetCustomerOrders 1,1000

When I execute the above code, I get the following execution plan:


Now, I will execute (Note: Clearing the caches) the same SP with a smaller range of CustomerID’s and see what kind of execution plan I get. Here is the code I will be executing:

USE AdventureWorks
GO
DBCC FREEPROCCACHE
EXEC GetCustomerOrders 1,10

When I execute the above code, I get the following execution plan:


This time I get a different execution plan. Now, you can see that when using a smaller range of CustomerID’s (1-10), I get an Index Seek operation. Depending on which execution of this SP was the first to be execute it, would compile and cache the execution plan for all subsequent executions of this SP. To verify this let’s run the following code and review the execution plans:

USE AdventureWorks
GO
DBCC FREEPROCCACHE
EXEC GetCustomerOrders 1,1000
GO
EXEC GetCustomerOrders 1,10

Here is the execution plan for the above T-SQL batch:


By looking at this code, you can see that the second execution of the GetCustOrder SP now performs a Clustered Index Scan operation to find all the customer orders from a small range of CustomerID’s. This occurs because the query optimizer only sniffed the parameters for the first execution of the GetCustOrder, which had a large range, and then cached that execution plan. The cached execution plan was then used for the second execution of the GetCustOrder SP.

The first compile of an SP creates the execution plan based on the parameters passed, and then this plan is stored in the procedure cache for the current and all future executions of the same SP. The last code segment above demonstrated how this could cause our second execution of GetCustOrder to use a less efficient execution plan--in this case, a Clustered Index Scan operation instead of an Index Seek operation. Let’s look at ways to overcome this problem.

Now, How to Eliminate the Parameter Sniffing Problem:

Luckily the fix is easy. Take your stored procedure that looks like this (generalizing a query here:

USE AdventureWorks
GO
ALTER PROC GetCustomerOrders (@FirstCust int, @LastCust int)
AS
DECLARE @FC int
DECLARE @LC int
SET @FC = @FirstCust
SET @LC = @LastCust
SELECT * FROM Sales.SalesOrderHeader
WHERE CustomerID BETWEEN @FC AND @LC

Now try to execute the above the query and see the execution plan, but you have to try yourself... Enjoy...


Still, this method of eliminating the parameter sniffing problem doesn’t mean you will get an optimal plan for each execution of the SP. You still only get one execution plan stored in the procedure cache, which will be used for all executions of the SP. Although that one execution plan on average will perform optimal if you call the SP many times with many different parameter values. If you really want to create different execution plans based on the parameters passed then you will need to uses a different approach.

Sunday, November 14, 2010

Debugger Improvements VS 2010

1. Pinning Data Tips While Debugging
Visual Studio 2010 also includes some nice new “DataTip pinning” features that enable you to better see and track variable and expression values when in the debugger.

Simply hover over a variable or expression within the debugger to expose its DataTip (which is a tooltip that displays its value) – and then click the new “pin” button on it to make the DataTip always visible:


Also, you can even enter comments for a pinned data tip, so that you can view the comment later.


You can “pin” any number of DataTips you want onto the screen. In addition to pinning top-level variables, you can also drill into the sub-properties on variables and pin them as well.

Another great thing is Pinned DataTips are usable across both Debug Sessions and Visual Studio Sessions:

Pinned DataTips can be used across multiple debugger sessions. This means that if you stop the debugger, make a code change, and then recompile and start a new debug session - any pinned DataTips will still be there, along with any comments you associate with them.

Pinned DataTips can also be used across multiple Visual Studio sessions. This means that if you close your project, shutdown Visual Studio, and then later open the project up again – any pinned DataTips will still be there, along with any comments you associate with them.

See the Value from Last Debug Session:

DataTips are by default hidden when you are in the code editor and the debugger isn’t running. On the left-hand margin of the code editor, though, you’ll find a push-pin for each pinned DataTip that you’ve previously set-up.

Hovering your mouse over a pinned DataTip will cause it to display on the screen. Below you can see what happens when I hover over the first pin in the editor - it displays our debug session’s last values for the “Request” object DataTip along with the comment we associated with them

Importing/Exporting Pinned DataTips:
Pinned DataTips are by default saved across Visual Studio sessions (you don’t need to do anything to enable this).

VS 2010 also now supports importing/exporting pinned DataTips to XML files – which you can then pass off to other developers, attach to a bug report, or simply re-load later.


VS 2010 has also got a tone of other Debugger Enhancements, read about them from Scott Gu’s blog if you are interested.

2. Breakpoint Labels:

Visual Studio 2010 Ultimate : Generating Sequence Diagrams

Another cool feature in Visual Studio 2010 is the ability to generate Sequence diagrams. You may right click inside a method and select “Generate the sequence diagram” from the pop up menu, to generate the diagram on the fly.

To keep example illustrative and simple I will use simple code. Let’s suppose we have ASP.NET MVC application with following controller.

Let’s say we want to generate sequence diagram for AddToProducer() method. All we have to do is to right click on method with mouse, select “Generate Sequence Diagram …” and modify some options.


You can choose various options like the Call Depth and Call scope as shown below:


On hitting the OK button, VIsual Studio 2010 analyzes the code and builds a sequence diagram based on its analysis results as shown below:

Monday, May 10, 2010

Generic Delegate

Fun with Func : Generic Delegate
Func & Action:generic delegate is a cool feature introduced with .NET 3.5. We will look at Func & Action in this short article. But let's start with .NET 1.1.

For instance, take a look a tutorial from C# 1.1 or 2.0, the tutorial on how to use the lambda operator. In that tutorial, we wrote a method that would take a delegate and fold it across the rest of the arguments to the function. It looked like this


public delegate int FoldIntDelegate(int a, int b);

public int Fold(FoldIntDelegate fid, params int[] list)
{
int result = 1;
foreach (int i in list)
result = fid(result, i);
return result;
}


That first line is the line that I'm complaining about - the line I'd like to get rid of. Well, guess what? we can! There are a whole bunch of basic delegate declaration in the System name-space that cover almost all of the common delegate declaration cases by using generics. For instance, that Fold method could have been written like this:

public int Fold(Func fid, params int[] list)
{
int result = 1;
foreach (int i in list)
result = fid(result, i);
return result;
}

The Funcs
The Funcs are the delegate declaration for delegates that return a value, and were first introduced in .NET 3.5. We have already seen one, the two argument Func. But there are Func declarations for everything from no arguments to 4 arguments:

Func(TResult)
Func(T1, TResult)
Func(T1, T2, TResult)
Func(T1, T2, T3, TResult)
Func(T1, T2, T3, T4, TResult)

So if you need more than 4 arguments, you have to make your own declaration. But most of the time, you don't, and so this covers many of the common signatures.

what if I don't want to return a value? Well, don't worry, that is here too:

The Actions
The Actions are the delegate declarations to use when your delegate doesn't return a value. Again, there are Actions for everything from zero to 4 arguments. And just as a note, the zero argument Action is not actually a generic delegate - cause there is no need for it to be (there are no types to deal with). The single argument Action was introduced in .NET 2, and the rest of them were added in .NET 3.5.

Action()
Action(T1)
Action(T1, T2)
Action(T1, T2, T3)
Action(T1, T2, T3, T4)

So, I think we got some idea about the Fun & Action generic delegate. Now see how I am using the above Fold function.

class Program
{
static void Main(string[] args)
{
var aa = new int[] { 1, 2, 3, 4 };
var a12 = Fold(ABC, aa);
}

public static int Fold(Func fid, params int[] list)
{
int result = 1;
foreach (int i in list)
result = fid(result, i);
return result;
}

static int ABC(int i1, int i2)
{
return i1 * i2;
}
}

Enjoy:)...

Monday, March 29, 2010

ASP.NET MVC Partial Views

In ASP.NET WebForms, UserControls were used to break the application into smaller pieces. Each piece represented an important part of the application. In ASP.NET MVC application you can achieve the same effect using RenderPartial and RenderAction methods. In this article we are going to demonstrate how to use RenderPartial to construct and use partial views.

Partial Render:
RenderPartial serves the purpose of rendering a UserControl in an ASP.NET MVC application. The views rendered are called PartialViews. In order to use a partial view in your application add a MVC UserControl to your application. The screenshot below shows which project template to select when adding a user control to your MVC application.


You can add the MVC View UserControl in your current view folder or in the shared folder. First the view folder will be searched for the specified user control followed by the shared folder.

We have added a simple "ViewUserControl.ascx" to our views folder. Now, let's see how we can load the partial views on the page. Inside the view page you can load the partial view using RenderPartial HTML helper method.

User Control:


Parent Page:


Now, if you run the page you will see that the partial view is loaded inside the view page as shown in the screenshot below:


Passing Data to Partial View:
In the previous example our partial view was independent which means it was not dependent on any data populated by the view page. In real world applications this might not be the case. We may need to pass additional data to our partial view. The good news is that the partial view has access to the same ViewData dictionary which is used by the view page.

Lets add a class with name Category, which I will pass to the partial view:
namespace MvcPV.Models
{
public class Category
{
public string Name {get;set;}
}
}

1. Untyped ViewPages:
ViewDataDictionery is an untyped collection consisting of a string and an object. The string represents the key, and the object holds the actual data. Like any untyped collection, the object can be of any type, but must be cast to the correct type before it is used. Items are referenced via their key in the ViewData property of the ViewUserControl (in the case of a PartialView). The second is a strongly typed collection, where items are properties of the ViewUserControl.Model property.

No modify the Home Controller for the action 'Index' which is responsible to render the partial view:
public ActionResult Index()
{
ViewData["Message"] = "Welcome to ASP.NET MVC!";

var categories = new List()
{
new Category() {Name = "Beverages"},
new Category() {Name = "Condiments"},
new Category() {Name = "Meat"}
};
ViewData["Categories"] = categories;
return View();
}

Now, the Categories.ascx partial view can easily access the ViewData["Categories"] as shown below:


Now, if you run the page you will see that the partial view is loaded inside the view page as shown in the screenshot below:


2. Strongly Typed Views
As of now we show that the ViewData dictionary is shared between the view page and the view user control (partial view). We can even make it better by strong typing the partial view and sending the model as a second parameter to the RenderPartial method. The code below shows how to make the ViewUserControl as a strongly typed view which can handle IEnumerable collection.

Now modify the user control:


Also modify the parent page to pass a strong type data to partial view:


Now Run the application and check how it looks:


Since, the ViewData dictionary is shared between the ViewUserControl and the ViewPage you can easily make changes to the object in the ViewUserControl and it will be reflected in the ViewPage using the controller.